
Prepare & Provide
Educating & Preparing People in the Event of a Disaster
Disasters strike quickly and most without warning. When a disaster strikes while you are at work, school or even on a day trip. Disasters that can force you to evacuate or confine you to your home. The basics of electricity, water and gas have been cut off to your home. What do you do?
Best way to stay safe is to prepare. When a disaster strikes and local government agencies, police fire and rescue can not reach you for a couple days. It is your job to keep your family safe. Then the best way to do that is through a well developed disaster preparedness plan.
Knowing what potential dangers that can fall upon your area. Then making the appropriate steps to educate and inform everyone in your home.
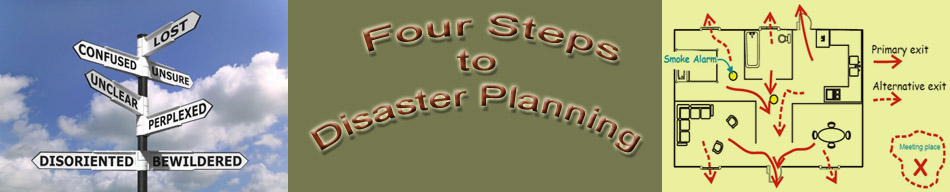
The four steps to disaster planning.
1) Make a Plan
That includes an evacuation plan and coordinate that plan with your school, work and communities' communication plan.
Practice this plan with your entire family. Life is never to busy to prepare the ones you care about.
Your family may not be together when disaster strikes, so plan how you will contact one another and review what you
will do in different situations.
Where to go in an emergency. Write down where your family spends the most time: work, school and other places you frequent. Schools,daycare providers, workplaces and apartment buildings should all have site-specific emergency plans.
Fill out cards with this information like these here. Then hand out to each member of your family.
Depending on your circumstances and the nature of the attack,the first important decision is whether you stay put or get away. You should understand and plan for both possibilities. Use common sense and available information, including what you are learning here, to determine if there is immediate danger.
In any emergency, local authorities may or may not immediately be able to provide information on what is happening and what you should do. However, you should watch TV, listen to the radio or check the Internet often for information or official instructions as it becomes available. If you’re specifically told to evacuate or seek medical treatment, do so immediately.
Staying In-
Whether you are at home, work or elsewhere, there maybe situations when it’s simply best to stay where you are and avoid any uncertainty outside. In fact, there are some circumstances where staying put and creating a barrier between yourself and potentially contaminated air outside, a process known as sheltering-in-place and sealing the room, is a matter of survival.
Plan in advance where you will take shelter in this kind of an emergency. Choose an interior room or one with as few windows and doors as possible. Consider pre-cutting plastic sheeting to seal windows, doors and air vents. Each piece should be several inches larger than the space you want to cover so that it lies flat against the wall. Label each piece with the location of where it fits.
Evacuating ( Bugging Out)
There may be conditions under which you will decide to get away, or there may be situations when you are ordered to leave. Plan in advance how you will assemble your family and anticipate where you will go. Choose several destinations in different directions so you have options in an emergency. If you have a car, try to keep at least a half tank of gas in it at all times.
Become familiar with alternate routes as well as other means of transportation out of your area. If you do not have a car, plan how you will leave if you have to. Take your emergency supply kit, unless you have reason to believe it has been contaminated, and lock the door behind you. Take pets with you if you are told to evacuate; however, if you are going to a public shelter, keep in mind that they may not be allowed inside. If you believe the air may be contaminated, drive with your windows and vents closed and keep the air conditioning and heater turned off.
Work Together-
Like individuals and families, should all have site-specific emergency plans. Ask about their plans and work together in establishing a well thought out preparedness plan. You will be better prepared to reunite your family and loved ones safely
during an emergency if you think ahead, and communicate with others in advance.
Best way to stay safe is to prepare. When a disaster strikes and local government agencies, police fire and rescue can not reach you for a couple days. It is your job to keep your family safe. Then the best way to do that is through a well developed disaster preparedness plan.
Knowing what potential dangers that can fall upon your area. Then making the appropriate steps to educate and inform everyone in your home.
The four steps to disaster planning.
1) Make a Plan
That includes an evacuation plan and coordinate that plan with your school, work and communities' communication plan.
Practice this plan with your entire family. Life is never to busy to prepare the ones you care about.
Your family may not be together when disaster strikes, so plan how you will contact one another and review what you
will do in different situations.
Where to go in an emergency. Write down where your family spends the most time: work, school and other places you frequent. Schools,daycare providers, workplaces and apartment buildings should all have site-specific emergency plans.
Fill out cards with this information like these here. Then hand out to each member of your family.
Depending on your circumstances and the nature of the attack,the first important decision is whether you stay put or get away. You should understand and plan for both possibilities. Use common sense and available information, including what you are learning here, to determine if there is immediate danger.
In any emergency, local authorities may or may not immediately be able to provide information on what is happening and what you should do. However, you should watch TV, listen to the radio or check the Internet often for information or official instructions as it becomes available. If you’re specifically told to evacuate or seek medical treatment, do so immediately.
Staying In-
Whether you are at home, work or elsewhere, there maybe situations when it’s simply best to stay where you are and avoid any uncertainty outside. In fact, there are some circumstances where staying put and creating a barrier between yourself and potentially contaminated air outside, a process known as sheltering-in-place and sealing the room, is a matter of survival.
Plan in advance where you will take shelter in this kind of an emergency. Choose an interior room or one with as few windows and doors as possible. Consider pre-cutting plastic sheeting to seal windows, doors and air vents. Each piece should be several inches larger than the space you want to cover so that it lies flat against the wall. Label each piece with the location of where it fits.
Evacuating ( Bugging Out)
There may be conditions under which you will decide to get away, or there may be situations when you are ordered to leave. Plan in advance how you will assemble your family and anticipate where you will go. Choose several destinations in different directions so you have options in an emergency. If you have a car, try to keep at least a half tank of gas in it at all times.
Become familiar with alternate routes as well as other means of transportation out of your area. If you do not have a car, plan how you will leave if you have to. Take your emergency supply kit, unless you have reason to believe it has been contaminated, and lock the door behind you. Take pets with you if you are told to evacuate; however, if you are going to a public shelter, keep in mind that they may not be allowed inside. If you believe the air may be contaminated, drive with your windows and vents closed and keep the air conditioning and heater turned off.
Work Together-
Like individuals and families, should all have site-specific emergency plans. Ask about their plans and work together in establishing a well thought out preparedness plan. You will be better prepared to reunite your family and loved ones safely
during an emergency if you think ahead, and communicate with others in advance.


2) Prepare a Kit
Just like having a working smoke detector in your home, having emergency supply kits will put the tools you may need at your fingertips. Be prepared to improvise and use what you have on hand to make it on your own for at least three days, maybe longer.
While there are many things that might make you more comfortable, think first about fresh water, food and clean air. Remember to include, and periodically rotate, medications you take every day such as insulin and heart medicine.
When preparing your kit consider two kits. One that will be for your home and this one will be more advanced, in the other consider it to be more light weight and this one you can carry with you in case you have to evacuate your home. These are commonly referred to as bug out bags or B.O.B.
The items will be the very minimum you will need to prepare...
* Water—one gallon per person, per day (3day supply for evacuation, 2week supply for home)
* Food—nonperishable, easy to prepare items (3day supply for evacuation, 2week supply for home)
* Flashlight
* Battery powered or hand crank radio (NOAA Weather Radio, if possible)
* Extra batteries
* First aid kit
* Medications (7day supply) and medical items
* Multipurpose tool
* Sanitation and personal hygiene items
* Copies of personal documents (medication list and pertinent medical information, proof of address, deed/lease to home, passports, birth certificates, insurance policies)
* Cell phone with chargers
* Family and emergency contact information
* Extra cash
* Emergency blanket
* Map(s) of the area
Other items will be family specific and suggested items will help meet additional needs.
* Medical supplies (hearing aids with extra batteries, glasses, contact lenses, syringes, cane)
* Baby supplies (bottles, formula, baby food, diapers)
* Games and activities for children
* Pet supplies (collar, leash, ID, food, carrier, bowl)
* Two-way radios
* Extra set of car keys and house keys
* Manual can opener
* Whistle
* N95 or surgical masks
* Matches
* Rain gear
* Towels
* Work gloves
* Tools/supplies for securing your home-crescent wrench for shut off valves
* Extra clothing, hat and sturdy shoes
* Plastic sheeting
* Duct tape
* Scissors
* Household liquid bleach
* Entertainment items
* Blankets or sleeping bags
* Heavy duty garbage bags
There are many ways to build a preparedness kit. Fit it to your needs most of these items here are designed for your home. Will go into more detail on items that will go into a Bug Out Bag & Survival kits in another section.
3) Shut-Offs
Know where your gas, electric and water main shutoffs are and how to turn them off if there is a leak or electrical short.
How to Shut-Off Utilities
There is no cost involved in teaching everyone in your home about how & when to turn off the gas, electricity, and
water after an earthquake. This can be as simple as clearly marking where the shut-off valves are, and posting
instructions close by.
Below are some common examples of shut-off valves. Even if you have something different, like a propane tank, the shut-off will be similar. If you cannot find the shut-off valves, or you do not understand the valve system, call your local utility company or tank provider.
Remember, consider shutting off utilities if you can smell gas, smell or see fire, or see damage to, from, or near
the utility lines. It is wise to shut off utilities if you are going to leave the home for extended periods of time. This is
because of the probability of aftershock.
BEFORE A DISASTER...
• TEST YOUR GAS VALVE: Locate and identify your gas meter and main shut-off valve with those persons
you believe could and should know how to shut off your gas if necessary. Identify the master shut-off
valve.
• Paint the valve bright red. Note: Caution, there may be more than one shut-off on your meter.
• Use the illustrations of gas meter and main shut-off valves to help you identify yours.
• Using a 12" adjustable, or other appropriate wrench, turn the main valve 1/8 of a turn only to the right or
left. (This movement may be difficult at first)
• CAUTION: Be careful, do not to turn any valve MORE than 1/8 turn to the right or left when testing. (If you
do, pilot lights will very likely go out and it will require a trained person to relight them.)
• After you have moved that valve to ensure that it works, KEEP THE WRENCH AT THE METER, use
plastic "zip ties" or straps to secure it to your meter.
• If you use an adjustable wrench be sure to store it pre-fit to your valve. That way in case it rusts or
corrodes it will still fit. Heavy oil or grease applied to the moving parts of the wrench, before you secure it,
will help keep it functional and ready for use. Do not buy any plastic or fiberglass gas wrenches. They
become brittle with time.
If the main valve will not turn 1/8 turn, then call the Gas Company immediately to have it fixed or replaced.
AFTER THE DISASTER. . .
Turn your gas off at the gas meter under the following conditions:
• If you smell, hear, or even suspect gas is escaping in your damaged or undamaged building(s).
• If your gas water heater or any other gas appliance has been knocked over and/or pulled free from its
wall connection.
• If your building has suffered extensive damage, such as large cracks in the walls or in the concrete slab
floors, etc. AND you suspect the gas lines may have been damaged.
• If you smell smoke and/or see or suspect fire.
• NOTE: If you have none of the above you are probably OK leaving your utilities on.
• NOTE: Many gas companies have training programs to teach you how to turn your gas back on. Contact
your local company for information.
• WARNING . . . If you smell gas don't turn on or off any switches. Don't use any open flame to check for
leaks. Don't turn on any battery operated flashlights, unless they are a safety/waterproof light.
• Chemical light sticks are a safe source of light in the event of gas leak.
• WARNING . . . It is very dangerous and therefore not recommended that you go
searching for gas leaks inside any damaged building.
How to Shut-Off Utilities
• BE AWARE: After an earthquake, aftershocks will continue to occur, possibly causing additional damage
(or even first damage) to your building(s).
• REMEMBER: Do not turn the gas valve back on after an earthquake, unless a qualified person has
checked extensively for gas leaks.
• REMEMBER: A qualified person (plumber, contractor, or trained homeowner) or gas company employee
will have to relight all the pilot lights.
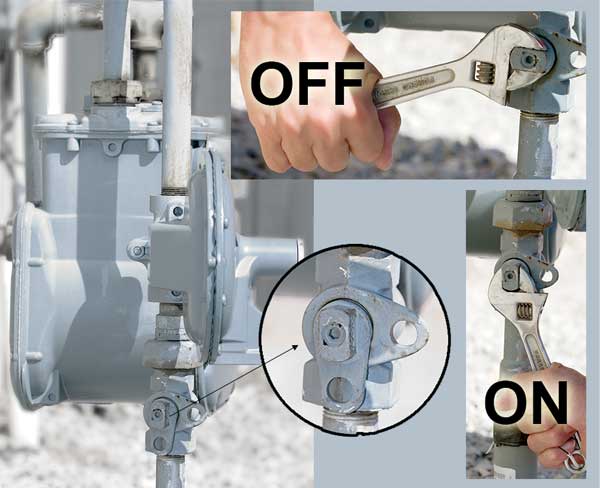
GAS SHUT-OFF
Locate main gas shut-off (usually outside house) at the gas meter. The valve is usually on a pipe coming out of
the ground, going into the gas meter. Turn the valve crosswise to the pipe (see diagram).
All the pilot lights in and around your home (stove, furnace, clothes dryer, swimming pool/ spa heater,
water heater, etc.) will go out when you turn the valve off.
You will need to have the gas company, or another qualified individual (plumber, contractor, or trained homeowner), relight every pilot when turning the gas back on. Forgetting to relight all the pilot lights could result in a dangerous gas buildup in your home.
Remember, if you don't smell gas or have severe damage to your home you should not have to shut the gas off. It's your decision.
Clear the area around the main gas shut-off valve for quick and easy access in case of emergency.
A wrench (or specialty tool), for turning off the gas, should be attached to a pipe next to the shut-off valve or in another easily accessible location.
You may want to paint the shut-off valve with white or fluorescent paint so that it can be located easily in an emergency.
If you are concerned about your ability to turn off the main gas shut-off valve or are unsure if it is in proper working order (indication of rust, etc.) or do not know how to relight your pilot lights, contact your local gas company. They can send a service representative to your house to show you the proper procedure and check the valve and pilot lights to be sure they operate properly.
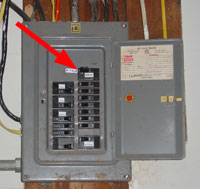
ELECTRICAL SHUT-OFF
REMEMBER- Use common sense when dealing with electrical currents. If area is wet you will be putting self into danger. Also this Only turns off power inside the house. Any down power lines outside the house will be live.
First locate all of your home's electrical panels. Note: There may be more than one. Your house may be equipped with fuses or circuit breakers. If your house has fuses, you will find a knife switch handle or pullout fuse that should be marked "MAIN." If your house has circuit breakers, you may need to open the metal door of the breaker box to reveal the circuit breakers (never remove the metal cover). The main circuit breaker should be clearly marked showing on and off positions.
Remove all the small fuses or turn off all the small breakers first, then shut off the "main." If you have any
sub-panels adjacent to the main fuse or breaker panel or in other parts of the house, in an emergency be safe
and shut them off too. Shorts can sometimes develop that cause a circuit to bypass the breaker or fuse.
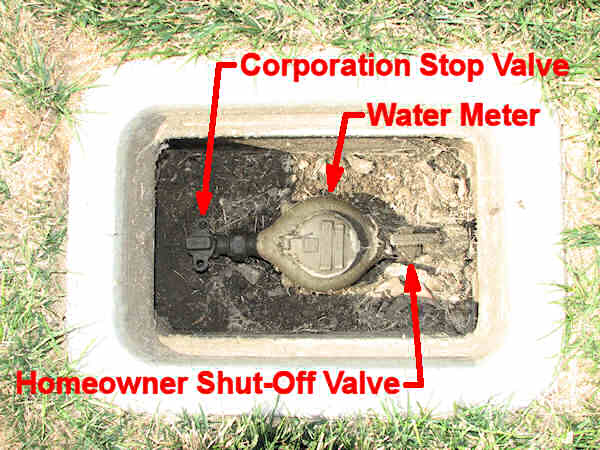
WATER SHUT-OFF
Locate the main water service pipe into your house (probably in the front at the basement level). You will see a
gate valve on the pipe. If you know you have leaks after an earthquake, you can shut off all water in your house
with this valve.
You may wish to paint the valve so it is easy to find in an emergency.
You can shut off all water to your property by finding the water meter box (usually at the street or sidewalk). Open
the cover with a long screwdriver or specialty tool. If this box is inaccessible or you cannot find it, call your local
water department. Be sure to identify this box and the water valve inside before the need to use them arises.
Inside the water meter box you will see a valve that is similar to the valve on your gas meter. Turn it just the same
as your gas valve.
Note: All responsible family members should be shown how to turn off utilities in case of emergency. They need to know what the utilities look like in both on and off positions.
4) Stay Informed
Identify how authorities will notify you and how you will get important information. Learn what you can do to prepare by contacting your local chapter of the American Red Cross to ask about first aid, CPR and disaster training.
Contact other like minded individuals and share information and training with one another.
Never assume you are 100% Prepared on your own there is always something that you can learn.
Know where your gas, electric and water main shutoffs are and how to turn them off if there is a leak or electrical short.
How to Shut-Off Utilities
There is no cost involved in teaching everyone in your home about how & when to turn off the gas, electricity, and
water after an earthquake. This can be as simple as clearly marking where the shut-off valves are, and posting
instructions close by.
Below are some common examples of shut-off valves. Even if you have something different, like a propane tank, the shut-off will be similar. If you cannot find the shut-off valves, or you do not understand the valve system, call your local utility company or tank provider.
Remember, consider shutting off utilities if you can smell gas, smell or see fire, or see damage to, from, or near
the utility lines. It is wise to shut off utilities if you are going to leave the home for extended periods of time. This is
because of the probability of aftershock.
BEFORE A DISASTER...
• TEST YOUR GAS VALVE: Locate and identify your gas meter and main shut-off valve with those persons
you believe could and should know how to shut off your gas if necessary. Identify the master shut-off
valve.
• Paint the valve bright red. Note: Caution, there may be more than one shut-off on your meter.
• Use the illustrations of gas meter and main shut-off valves to help you identify yours.
• Using a 12" adjustable, or other appropriate wrench, turn the main valve 1/8 of a turn only to the right or
left. (This movement may be difficult at first)
• CAUTION: Be careful, do not to turn any valve MORE than 1/8 turn to the right or left when testing. (If you
do, pilot lights will very likely go out and it will require a trained person to relight them.)
• After you have moved that valve to ensure that it works, KEEP THE WRENCH AT THE METER, use
plastic "zip ties" or straps to secure it to your meter.
• If you use an adjustable wrench be sure to store it pre-fit to your valve. That way in case it rusts or
corrodes it will still fit. Heavy oil or grease applied to the moving parts of the wrench, before you secure it,
will help keep it functional and ready for use. Do not buy any plastic or fiberglass gas wrenches. They
become brittle with time.
If the main valve will not turn 1/8 turn, then call the Gas Company immediately to have it fixed or replaced.
AFTER THE DISASTER. . .
Turn your gas off at the gas meter under the following conditions:
• If you smell, hear, or even suspect gas is escaping in your damaged or undamaged building(s).
• If your gas water heater or any other gas appliance has been knocked over and/or pulled free from its
wall connection.
• If your building has suffered extensive damage, such as large cracks in the walls or in the concrete slab
floors, etc. AND you suspect the gas lines may have been damaged.
• If you smell smoke and/or see or suspect fire.
• NOTE: If you have none of the above you are probably OK leaving your utilities on.
• NOTE: Many gas companies have training programs to teach you how to turn your gas back on. Contact
your local company for information.
• WARNING . . . If you smell gas don't turn on or off any switches. Don't use any open flame to check for
leaks. Don't turn on any battery operated flashlights, unless they are a safety/waterproof light.
• Chemical light sticks are a safe source of light in the event of gas leak.
• WARNING . . . It is very dangerous and therefore not recommended that you go
searching for gas leaks inside any damaged building.
How to Shut-Off Utilities
• BE AWARE: After an earthquake, aftershocks will continue to occur, possibly causing additional damage
(or even first damage) to your building(s).
• REMEMBER: Do not turn the gas valve back on after an earthquake, unless a qualified person has
checked extensively for gas leaks.
• REMEMBER: A qualified person (plumber, contractor, or trained homeowner) or gas company employee
will have to relight all the pilot lights.
GAS SHUT-OFF
Locate main gas shut-off (usually outside house) at the gas meter. The valve is usually on a pipe coming out of
the ground, going into the gas meter. Turn the valve crosswise to the pipe (see diagram).
All the pilot lights in and around your home (stove, furnace, clothes dryer, swimming pool/ spa heater,
water heater, etc.) will go out when you turn the valve off.
You will need to have the gas company, or another qualified individual (plumber, contractor, or trained homeowner), relight every pilot when turning the gas back on. Forgetting to relight all the pilot lights could result in a dangerous gas buildup in your home.
Remember, if you don't smell gas or have severe damage to your home you should not have to shut the gas off. It's your decision.
Clear the area around the main gas shut-off valve for quick and easy access in case of emergency.
A wrench (or specialty tool), for turning off the gas, should be attached to a pipe next to the shut-off valve or in another easily accessible location.
You may want to paint the shut-off valve with white or fluorescent paint so that it can be located easily in an emergency.
If you are concerned about your ability to turn off the main gas shut-off valve or are unsure if it is in proper working order (indication of rust, etc.) or do not know how to relight your pilot lights, contact your local gas company. They can send a service representative to your house to show you the proper procedure and check the valve and pilot lights to be sure they operate properly.
ELECTRICAL SHUT-OFF
REMEMBER- Use common sense when dealing with electrical currents. If area is wet you will be putting self into danger. Also this Only turns off power inside the house. Any down power lines outside the house will be live.
First locate all of your home's electrical panels. Note: There may be more than one. Your house may be equipped with fuses or circuit breakers. If your house has fuses, you will find a knife switch handle or pullout fuse that should be marked "MAIN." If your house has circuit breakers, you may need to open the metal door of the breaker box to reveal the circuit breakers (never remove the metal cover). The main circuit breaker should be clearly marked showing on and off positions.
Remove all the small fuses or turn off all the small breakers first, then shut off the "main." If you have any
sub-panels adjacent to the main fuse or breaker panel or in other parts of the house, in an emergency be safe
and shut them off too. Shorts can sometimes develop that cause a circuit to bypass the breaker or fuse.
WATER SHUT-OFF
Locate the main water service pipe into your house (probably in the front at the basement level). You will see a
gate valve on the pipe. If you know you have leaks after an earthquake, you can shut off all water in your house
with this valve.
You may wish to paint the valve so it is easy to find in an emergency.
You can shut off all water to your property by finding the water meter box (usually at the street or sidewalk). Open
the cover with a long screwdriver or specialty tool. If this box is inaccessible or you cannot find it, call your local
water department. Be sure to identify this box and the water valve inside before the need to use them arises.
Inside the water meter box you will see a valve that is similar to the valve on your gas meter. Turn it just the same
as your gas valve.
Note: All responsible family members should be shown how to turn off utilities in case of emergency. They need to know what the utilities look like in both on and off positions.
4) Stay Informed
Identify how authorities will notify you and how you will get important information. Learn what you can do to prepare by contacting your local chapter of the American Red Cross to ask about first aid, CPR and disaster training.
Contact other like minded individuals and share information and training with one another.
Never assume you are 100% Prepared on your own there is always something that you can learn.